
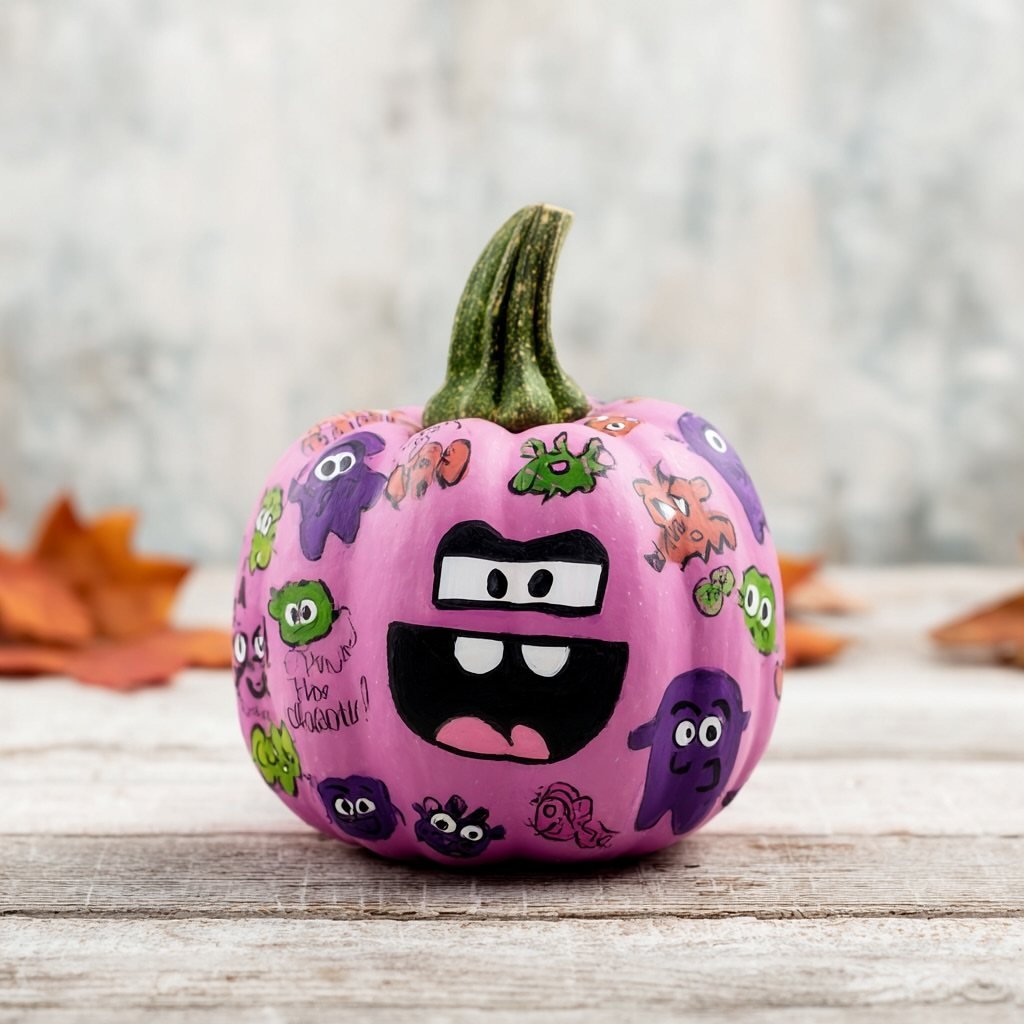
Pumpkin painting ideas on this list run from a quick thumbprint ghost to a full Minion build, and the right one depends on whether you need it done before guests arrive or want it to carry through the whole season.
The confetti brushstroke technique covers a pumpkin in flat color blocks with no blending at all, while the marbled method needs a bucket of water and a garage door open for the fumes.
1. Checkered Pumpkin

Checkered pumpkins read expensive even when the paint came from the craft store bin.
Taping before you color is what makes this work: duct tape gives you clean edges that freehand never will, and alternating thick and thin bands keeps it from looking like a chessboard. Two colors feel Parisian; three feel playful.
Faux pumpkins work best here since the surface is already smooth, and you will want to keep this one past November.
2. Candy Corn Painted Pumpkin

Candy corn gets a bad rap as a flavor, but as a color story it still lands. Horizontal bands of white, orange, and yellow turn any pumpkin into instant Halloween without the carving mess.
Layering is what matters: let each section dry fully before masking the next, or the colors bleed into that muddy brown nobody wants. Real pumpkins work fine, though the paint will last longer on foam.
Kids can manage the broad strokes; adults should handle the tape lines.
3. Thumbprint Ghosts Pumpkin Painting

Thumbprints turn a pumpkin into a guest book, a keepsake, or just an afternoon with toddlers who cannot be trusted near knives.
One dip in white acrylic, one press, and you have the body of a ghost; a quick dot with a brush gives it eyes.
The same thumb becomes a flower petal, a spider abdomen, or a whole colony of tiny spirits clustered around the stem. Small pumpkins keep the scale right, and the paint washes off fingers easier than it washes out of clothes.
4. Funny Faces

Funny faces let you skip the pressure of making something beautiful and just make something alive. Sharpies sketch the features, paint pens fill them in, and puff paint adds the texture that makes kids want to touch it.
Templates help if your freehand tends toward the nightmare-inducing, but half the charm is in the wobbly line. This is the idea for the host who ran out of time and needs every pumpkin done before guests arrive.
5. Pastel Ghosts

Pastel ghosts trade scream for whisper: soft yellow bleeding into pink, little white spirits floating across the gradient like they belong at a baby shower that happens to fall in October.
The ombre takes patience, blending wet paint with a sponge or a soft brush until the seam disappears. White ghosts painted on top pop against the color without turning harsh.
Small pumpkins suit the delicacy; a large canvas would swallow the mood.
6. Galaxy Pumpkin

Galaxy pumpkins are where a toothbrush earns its place in the craft drawer. Base coat in deep purple or black, then flick white paint through the bristles to scatter stars across the surface.
The splatter is random in a good way; constellations can be added with a fine brush if you want recognizable shapes. Glitter around the stem catches light after dark.
Faux pumpkins take the paint best, though a real one sprayed black first works in a pinch.
7. Drip Pumpkin Painting

Melted crayon drips turn a plain pumpkin into something that looks boutique-bought.
I painted mine white first so the pink and turquoise would read clearly, then broke old crayons into halves and held them to the top with a hair dryer on low.
The wax runs fast once it starts, so I rotated the pumpkin slowly and let each color cool before adding the next. Metallic gold crayons worked best for the stem.
This one needs outdoor space or a tarp; the splatter goes farther than you’d expect. Kids under 8 should watch the melting step, but they can pick the color order and tilt the pumpkin themselves.
8. Spa Pumpkin

A spa-day pumpkin reads as clever rather than spooky, which matters if your porch decor needs to work through Thanksgiving.
The face mask is just teal paint left to dry around cutout eyes and a smile, and the cucumber slices are painted seeds or printed paper circles glued flat.
I stretched a black hand towel instead of a shower cap for the head wrap, pinned at the back with sewing pins pushed deep so no sharp points show.
Dry ice or a humidifier makes the steam effect; for a porch display, skip it and let the expression do the work.
This one suits small round pumpkins best, since the gag depends on reading a human face in the shape.
9. Marbled Pumpkin

Nail polish marbling gives a gloss no acrylic matches, though the fumes mean this is a garage or patio project.
Fill a bucket to the rim with water, hold the polish brush just above the surface to let it drip, then drag a toothpick through fast before the film sets.
Dipping the pumpkin straight down pulled the swirl up the sides; twisting on the way out kept the pattern from doubling back on itself.
Pastels read as Halloween-without-the-orange if that fits your house; orange and black polish work the same way for traditional color. Glitter polish adds texture but skips the marbled effect; keep it to the stem only.
10. Emoji Pumpkins

Emoji faces turn mini pumpkins into party favors or place cards that guests actually take home. Yellow paint needs at least two coats over orange gourd skin; one coat dries streaky every time.
Heart eyes and sunglasses both read instantly from the street, which is the test for porch decor, and the expressions scale down to golf-ball-size pumpkins without losing their shape.
Older kids can freehand the faces; for younger ones, I print emoji images to size and trace the outlines in pencil before painting.
A set of 6 in matching yellow looks deliberate; mixing expressions keeps it from reading as a factory set.
11. Spider Web Pumpkin

Tape webs give a crisp line no freehand brush achieves, and the technique works on lumpy pumpkins where drawing fails.
Stretch masking tape from stem to base in radiating lines, add concentric arcs between them, and press every edge flat so spray paint cannot seep under.
Two light coats of black spray paint with drying time between; peel the tape slowly, pulling straight back, and clean white lines show through where the pumpkin was covered.
Sequins and gem spiders are glued on after; a plastic spider from the dollar store works the same way and survives rain better. This one takes patience on the taping and rewards it.
12. Skull Painted Pumpkin

Day of the Dead skulls let you use every bright color left in your paint set after the orange and black run out. The white base coat is essential; colors dull against raw orange skin without it.
Floral patterns around the eyes and a heart-shaped nose are the recognizable marks, and paper flowers pinned to the stem finish the look without more painting time.
Stencils help for symmetry if you’re selling the design; for a porch pumpkin, I freehand and let one eye tilt higher than the other.
This suits kids old enough to manage detail work, or adults who want one standout piece among simpler painted pumpkins.
13. Hand Lettered Painted Pumpkins

Gold ink on a dark ground reads as place cards at a dinner table or as favors guests take home.
The maker finishes each pumpkin with hand-painted gold calligraphy and your choice of wording, so the same approach works for seating assignments, family names, or single words like "grateful" or "spooky."
If your handwriting makes you wince, trace a printed font with pencil and fill in with a gold paint pen or oil-based Sharpie. No vinyl cutter required; the slight wobble of a freehand line looks intentional on an organic surface.
I’d pick this one for a table where guests sit close enough to read the names across the setting. These minis disappear on a porch; grouped on a mantel or down a runner, they hold their own.
14. Floral Painted Pumpkin

Teal pumpkins with cabbage roses and trailing leaves feel closer to heirloom china than to Halloween. Acrylic paint layers in a vintage palette: dusty pink, cream, a bruised purple that reads as shadow rather than shadow itself.
Becki Clark’s three-in-one tutorial runs through the technique for flowers that repeat rather than compete. A woven basket does half the work of tying them together; a wooden bowl or tarnished tray would push the same mood.
This is the idea for someone who wants fall decor to last past October 31. Each pumpkin needs drying time between layers, so count on an afternoon rather than an hour.
15. Colorful Striped Pumpkins with Gold

Vertical stripes on a round object do what vertical stripes on a body do: stretch it. These read taller than they are, which matters when your pumpkins are the palm-sized kind that grocery stores sell by the bin in October.
The metallic line at each color boundary is the detail that saves this from looking like a child’s craft. Gold leaf adhesive pen, or even a metallic marker, laid down after the base colors dry.
First Day of Home uses foam pumpkins, which means you can store these and bring them back next year without the slump of a dried gourd.
I’d skip the foam only if your porch hits direct rain; even outdoor acrylic pools oddly on the slick surface.
16. Cute Monster Face Pumpkin

Bright blue is not a color pumpkins come in, which is exactly why this one reads as monster rather than vegetable with a face.
The cartoon eyes, each a different size, and the pink glitter tongue say this was made for a child to laugh at, not a child to fear.
Aubree Clark’s step-by-step covers three variations, but the principle is the same across all: one base color, one face color, details in a third.
Craft paint or Sharpie, your choice; the teeth need a steady hand either way, but everything else forgives a wobble.
This suits the parent who promised painted pumpkins and forgot until the morning of the party. Two coats of base color, one of face, done in an hour if you use a hair dryer between layers.
17. Headless Horseman Silhouette Pumpkin

A silhouette needs two things to work: a ground dark enough to sink into, and one light source placed with intention.
Here the moon does both jobs, and the headless horseman’s jack-o’-lantern becomes a second light source inside the scene, which is the trick that makes you look twice.
Adhesive stencils or printed shapes taped in place let you paint the negative space around a figure without freehanding the outline.
Matte black over a blue underlayer, or deep navy if you want the night to read as slightly less absolute.
This is the most technically demanding idea on the list so far.
I’d save it for a pumpkin large enough to give the scene room to breathe, and for a display spot where the light hits it from the front after dusk.
18. Daisy Smiley Face Pumpkin

The smiley face is retro, the daisies are nostalgic, and the pale yellow ground is trying to be neither.
The combination lands in a nostalgic space that does not commit to any single decade, which is useful if your fall decor needs to bridge a household of mixed ages.
Black paint for the face, white with yellow centers for the flowers, all on a base coat that reads as cream in some light and as barely-there color in others.
The maker keeps the pattern scattered rather than symmetrical, which saves you from measuring placement.
This is the pumpkin for someone who finds Halloween too dark but still wants to participate. No one will mistake this for scary, and at a costume party it reads as opt-out rather than alternative.
I’d put it in a kitchen or breakfast nook where the light is bright and the mood is already.
19. Minion Painted Pumpkin

Yellow acrylic paint turns any pumpkin into Minion material. Two large canning jar lids, hot-glued together and painted silver, make the goggles sit right; a black Sharpie fills in the strap and pupils.
Denim-blue craft paint covers the lower third for overalls, with two black buttons dabbed on top. Pipe cleaners punched through the stem hole give that sprout of hair.
This one eats time on the drying between coats; figure 3 hours total, most of it waiting. Kids under 8 will need help with the hot glue.
I’d save it for a child who already loves the character; the specificity means nothing to anyone else.
20. Ghostface Swirl Pumpkin

The Ghostface mask reads instantly even at pumpkin scale. Black paint outlines the hood and the stretched oval of the face; white fills the mask itself, with black ovals for the eyes and the long nose shape.
The swirls around it are whatever acrylic colors you have; the photo uses pink and purple, though keeping them thin enough that the face still dominates takes some restraint.
A foam or artificial pumpkin works better than real here; the detail work takes long enough that a rotting gourd undoes your effort. I’d paint this one for a teen who wants Halloween scary without gore.
The swirls soften the threat just enough.
21. Stitch and Angel Painted Pumpkins

Stitch and Angel need ears to read as characters, not just colored pumpkins. Paper ears attach at the stem; card stock or craft foam held with hot glue works, though they will not survive rain.
Paint the base coat first: ocean blue for Stitch, pale pink for Angel, both in acrylic with 2 coats minimum.
The facial details, the nose shape and the eye placement, are what sell it; a reference image open on your phone saves repainting.
A pair displays better than either alone, though you will need two pumpkins and twice the paint. I’d assign one character per child and let them race.
22. Fall Motifs Mini Pumpkin

Mini pumpkins reward a fine brush and a steady hand.
White gesso or acrylic primer gives the base a clean start; from there, tiny autumn icons, ghosts no bigger than a fingernail, crescent moons, a few leaves, read as charming rather than cluttered.
The scale forces simplicity; three shapes repeated beat one crowded scene.
Handing minis around a table with shared paints keeps a group busy through an afternoon. I’d buy extra pumpkins; someone always wants a do-over, and the white base does not forgive errors.
23. Spider-Man Pumpkin

Spider-Man demands a clean red base and a patient hand for the webbing. A real pumpkin works, but foam holds the paint truer and will not soften where the black web lines meet.
Spray paint the red in thin coats, 3 at least, letting each dry to the touch. The web starts from a center point between the eyes; straight lines radiate out, then curved connectors between them.
A fine brush or paint pen controls the black; a brush loaded too heavy bleeds.
White oval eyes, slightly angled, finish it. This one suits a kid old enough to trace lines with care, maybe 10 and up, or a parent who wants to paint while the child directs.
24. Confetti Brushstroke Painted Pumpkins

Thick rectangular brushstrokes, laid side by side like mosaic tiles, cover these pumpkins in blocks of contrasting color. The technique is faster than it looks: load a flat brush, press, lift, repeat.
No blending, no detail work. Metallic gold on the stems ties the chaos together against the matte body colors.
Acrylic craft paint in a handful of colors runs cheap, and one coat suffices on a white-primed base. The pattern forgives unevenness; in fact, rough edges help.
I’d hand this to a group that wants something modern on their porch without a template or a stencil in sight.
25. Polka Dot Painted Pumpkins

Small dots read as texture from across a room and hold detail up close, which makes this the rare painted pumpkin that works on a porch step and on a dining table.
Yellow and white dots in vertical lines and one clustered patch turn a small pumpkin into something graphic; any two colors against the orange base do the same work.
A round tool helps: the back end of a paintbrush, a cotton swab with the fluff pulled off, or the rubber end of a pencil. Dip, stamp, reload.
Vary the spacing for a hand-drawn feel or keep it even for something more graphic. The solar-eclipse version layers a dark ring around one dot; the retro route stacks dots in mod color blocks.
I’d keep this one for a group project where skill levels vary, since a misplaced dot just adds character.
26. Repeated Ghost Pattern Pumpkin
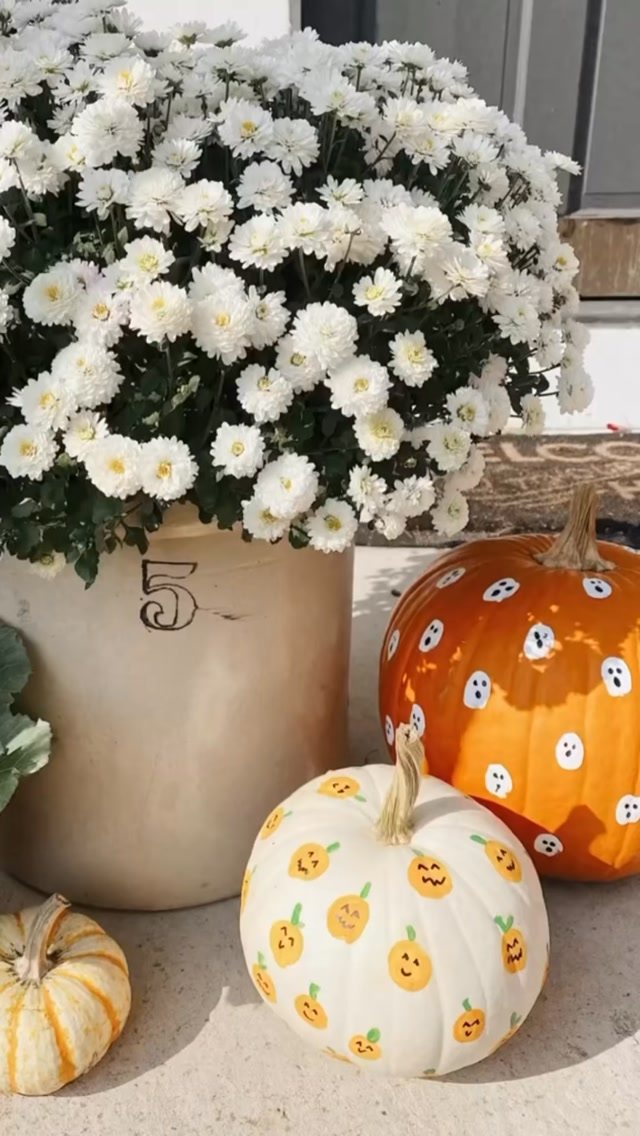
Tiny repeating shapes turn a pumpkin into pattern rather than picture, which suits hosts who want decoration that reads as design instead of craft project.
White ghosts stamped across orange read instantly as Halloween, though the same approach works with any small icon: bats, candy corn, or the tiny jack-o’-lanterns that appear on the white pumpkin beside it.
A sponge cut to shape or a small stamp from the craft store speeds this up; freehand each ghost and the 20th will look tired.
The scale matters: at under an inch tall, the shapes read as all-over print; much larger and the pumpkin becomes a single scene.
This one trades the big visual impact of a face or silhouette for something that holds up as part of a larger display, especially when you set several pattern pumpkins together.
Best Paint for Pumpkins
FolkArt multi-surface paint sticks to pumpkin skin better than standard acrylic and holds color through weather, which matters if your porch faces rain.
Apple Barrel and regular FolkArt work too; chalk paint from the same line gives a matte, vintage look if that fits your house.
Tempera and latex are options but not ones I’d reach for first; anything runny beads on the waxy outside of a real gourd. Watercolor is out entirely.
One coat of water-based sealant or varnish after the paint dries keeps the finish from scratching when you stack them in storage.
Skip the sealant only if you are composting the pumpkin after Halloween; the varnish keeps it from breaking down.
Materials Needed
Craft paint and brushes are the foundation; the project decides what kind. Acrylic covers most ideas, spray paint speeds up base coats, chalk paint gives that soft plaster look.
Painter’s tape matters more than the brush quality for anything with stripes or geometry.
Fine-tipped brushes do detail work; flats cover ground faster. A paint palette saves you from dirtying a plate, though a paper plate works the same way.
Marker pens add words or outlines after the base coat dries.
Glitter, pom poms, googly eyes, and pipe cleaners work as paint alternatives or additions for texture and dimension. Decals or printed SVGs traced in pencil save freehand work on characters and faces.
Real gourds need sealant or they slump by Thanksgiving.
No-carve Alternatives
Painting skips the icky pumpkin guts entirely, which is the draw for hosts who need porch decor without the newspaper-and-spoon cleanup.
No knife means younger kids participate, and the finished pumpkin lasts from early October through Thanksgiving if you did not carve it.
Decoupage is the other no-carve route; glued paper or fabric on a painted ground gives pattern without brush skill. Most of these ideas stay paint-only, but a few layer both.
You lose light. A carved pumpkin glows; a painted one needs a display spot where that does not matter, or a string light tucked behind it.
I’d put painted pumpkins where they are seen by day: a mantel, a table runner, a breakfast nook window. Save the carved jack-o’-lantern for the steps where the dark needs breaking.
But while pumpkin carving is traditional and fun, it’s also downright messy — with all the tools, scraping, and cleanup involved (not to mention the rotting pumpkins that may not even make it until October 31.)
Frequently Asked Questions
What are some cute pumpkin painting ideas?
Floral designs with cabbage roses, monster faces in bright blue, galaxy themes with toothbrush splatter, checkered patterns with duct tape, and thumbprint ghosts for small children all work well.
Mini pumpkins suit fine details like fall motifs, while larger ones carry scenes like the headless horseman silhouette. Faux pumpkins let you keep the design past November; real ones work for single-season displays.
What to put on pumpkins before painting?
Wipe dirt off with a damp cloth and dry fully before any paint touches the surface. White gesso or acrylic primer lays down a clean ground that keeps florals and mini motifs from sinking into orange skin.
Colors bleed into muddy brown if the layer underneath is still wet, so I wait until it is dry to the touch before going back in.
Sealant adds weather protection, though skipping it and placing the pumpkin in a sheltered spot works for wildlife-friendly displays.